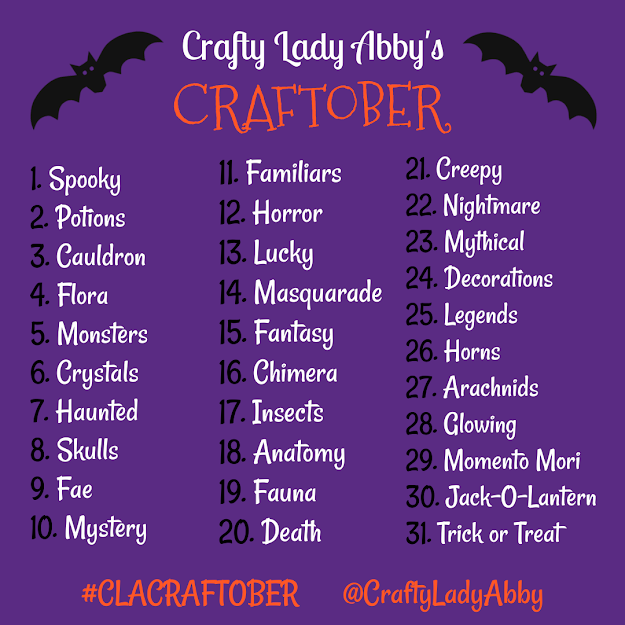
Friday, May 17, 2013

OOTD: Stripes, Glitter, and Books

Monday, I needed to go to Michael's to buy cord for my necklace project. While there, Alex used a birthday gift card to buy a weather kit and a baked jewelry kit. I bought the cord and a baked jewelry kit for myself. We'll make the baked (melted plastic in set metal designs) jewelry projects together soon. I'll show you how that works out, and maybe show how to make something by melting Perler beads...because I've melted them in the past. Afterwards, we headed to Barnes and Noble, for her to buy a few books with multiple gift cards she'd gotten as presents. She bought a Keri Smith's Finish This Book, Doodling with Jim Henson, and Lisi Harrison's Monster High. After that store, we went home.

Before we left the house, I put my hair up in a loose bun using 2 Dark Hair Spin Pins by Goody (I bought my pack at Dollar Tree last week, so check there. They have ones for blonde, and light brown hair too. They are amazingly easy and secure to use! I put on a striped semi-slouchy shirt (Ross), and a long striped draped cardigan (Ebay), over my black tank (TJ Maxx) and jeans (Rugged Warehouse). I also slipped on the ombre glitter jewelry set I had finished the day before. My black flats are my go to shoes, though they need replacing, because they are worn out! I've been using this Betsey Johnson bag for the past few weeks. I bought it at TJ Maxx some time last year, for $40. I can rationalize $40 for a Betsey Johnson bag, especially when covered with skulls, roses, bows, and ruffles.

I flipped through Scott Schuman's The Sartorialist: Closer (from his street style website, The Sartorialitst) while Alex chose a drawing book. She chose the Jim Henson one.


If I look unamused, it's because teaching a 10 y/o to take nice attractive photos of me is difficult. I find it funny that the eyebrow that always looks half missing (my left one) actually grows the widest at the section. I need to fill it in...but obviously again, I'm not wearing makeup. Ha!


A look at the glittery ombre jewelry set on me.


A fuzzy close up photo of the glitter jewelry before I added the findings. Glitter is hard for my phone to photograph well, but you get the idea.


When we got home, I looked a the receipt, and noticed this amusement at the bottom. Going to the craft section of any book store can often turn up books that my friends have written. Since Alex purchased two type of creativity books, these suggestions for Noah Scalin's (who I'm close friends with) 365: A Daily Creativity Journal: Make Something Every Day and Change Your Life!
and Unstuck: 52 Ways to Get (and Keep) Your Creativity Flowing at Home, at Work and in Your Studio populated at suggestions. I think this is a cross selling thing set up by Barnes and Noble to sell more books based on similarity to ones purchased. He found the suggestions on the receipt amusing.

Disclaimer, the links above to products are affiliate links. If you make a purchase using those links, I'll receive a small compensation. This all goes to fuel my crafty madness. You're not going to hurt my feelings if you go to a physical store (especially a locally owned book store) instead of shopping with Amazon.

Thursday, May 16, 2013

DESIGN PROCESS: Jewelry and Ponderings About Packaging

Today, I spend several hours working with many of the nature photos that I took years ago, to make jewelry. I created a collage grid to make even squares with the photos. I also created a collage grid for several panoramic photos that I'll possibly make into bracelets. I'm still trying to figure out the FedEx copy site, so I can order prints on cardstock. I'm also pondering a package design that can go with existing clear bags that I have. I plan on selling my jewelry creations in local shops, which will need nice packaging. For Etsy sales, I just need to wrap them up nicely, like I always do for anything I sell on Etsy. Lots of work to do. I also need to create business cards for this blog. I'd love some that incorporate this blog, my Etsy shop, and Skull-A-Day. I have ones that are for both my Etsy shop and Skull-A-Day, because I wasn't using my blog for much back then...which has obviously changed. It feels good to get back into making things like this.


This pretty metal Skull with Brain necklace arrived yesterday. It was made by Rachel Stork Stolz of Anatomical Element, in exchange for doing a contest for her on Skull-A-Day. The contest is currently still running till tomorrow night! Enter here! This photo doesn't do it justice. It's really shiny, and Sophie kept nuzzling me while I was trying to photograph it. She has several variations of this necklace, and some other awesome anatomical designs stocked in her Etsy shop. Seriously, you need to check out her jewelry!

Wednesday, May 15, 2013

DESIGN PROCESS: Finishing Galaxy Necklaces

I'm working hard at finishing these galaxy necklaces, so I can sell them. So far, everything is going well. Yesterday, I finished 14 necklaces, by adding jump rings and adjustable necklace cords. This morning I finished another batch, and have about 2/3 of the necklaces finished! YAY! Through the rest of today, I worked on finishing the last third, which involves a lot of drying. Tomorrow, I'll add the jump rings and necklace cords to those. Sophie, my adorable tuxedo kitty laid in the large work tray, despite having a soft clear spot on the couch to sleep. Thankfully, she moved after the photo of her, and slowly stopped half laying in the tray, so I could work on the last batch of necklaces. While they dry, I've been playing around with other designs. I love being able to make wearable art that has original artwork, vs copies. This is more fun for me to make, than having to make copies...which requires more waiting time than it takes to make a new painting. The effect the sealer gives to the water color paint is something that can't be achieved with a copy. Hopefully, tomorrow, I'll get around to photographing the finished ones, and listing a few on Etsy.


These photos are from my Instagram. Feel free to follow me there.

Monday, May 13, 2013

FAMILY: Mother's Day Sharing

Yesterday was Mother's Day. I tasked my mom with finding some favorite photos of her and me, and email them to me. I had a few, but there are boxes of old photos at my parents' house. My parents spent the day looking through them, scanned their selections, and emailed them to me last night. I meant to post this earlier today, but I had some project things to do. Anywho, let's get on with the family photo sharing.

This is my mom at 28, in front of my parents' new house, pregnant with me. I was born late Spring, in June 1980, so this is probably late Winter or sometime in Spring. I was my mom's 1st pregnancy, but her 2nd child. I have an older brother who is adopted, and 5 years older than me. I'm sort of the miracle child, because though my dad and her desperately wanted to make a child, they weren't able to for years. Then, they stopped trying, focused on getting this house finished, and shortly after they moved in, I was made.


Fast forward a few years... This is me at Halloween one year. I was about 2 or 3, I think. The bunny costume is one that my mom made. She had made a few costumes. If I recall correctly, she had made this one for my older brother (the vampire you see peeking behind our mom) when he was little. We all wore it at some point, when we could fit into it. I have a younger brother too (who you will see in the next photo), who also wore the bunny costume...or maybe one of the other ones she made. She's one of the main reasons I love making costumes. We always had awesome Halloween costumes. She probably would have helped us make all of them ahead of Halloween, had we not become the last minute costume planners...a skill that still comes in handy now. My parents also loved dressing up for costume parties. My favorite costume memories of them are when they cross dressed...but as you will see in a moment, that is especially funny with my dad. No, you won't see him in costume too, just what he looks like. We might leave a drag photo for a Father's Day post...if I have permission from him, and there is a good photo. He has silly costumes. While we're on this photo, let me draw your attention to my mom and those boots. I loved those boots for years. I don't think she still has them, but she loved wearing them and I really wanted to as well. She's always been a very stylish lady in her own way. She's an artist too, but that shouldn't be a surprise.


I mentioned that younger brother. This is him shortly after he was born. He looks very small, so I was probably still 2, but close to 3. He was born in April of 1983. I don't recall anything from him being a baby, other than the day he was coming home with my parents, and that only involves not being allowed to paint a banner with my grandmother and then 8 year old brother.


You probably immediately notice my brother has a diaper on his head. This was a clean one and he probably put it on his own head. When ever he gets married, I'm showing this to his wife...just so she is aware of the type of kid they'll make. My mom's legs pretty much still look like that. My hair style says that mom played with it. She LOVES playing with hair. My daughter often comes back from her house with her hair done up in some way. I didn't mind her doing my hair. I had a perm for 7 years and she was amazing at making it look great and not a horrid frizzy mess! Until she broke her arm a few years ago, she used to help me dye my hair when I needed a touch up. I have to do it myself now. It's not as fun. She still gives me hair products she didn't like, on occasion. She also used to do my younger brother's hair. There was that time when Sun-in was cool and they used lemons and the sun to lighten his hair.


According to my parents, I was 2 in this photo. You younger people might not recognize who I'm dressed as, but you older ones might. For this particular Halloween, I dressed as Raggedy Anne. My grandmother had made me a "My Size" Raggedy Anne doll. I used the doll's clothing for my costume, with the addition of a long sleeve shirt. I reused the pinafore a different Halloween for a Strawberry Shortcake costume. Again, you younger people are probably used to the reboot versions of her. However, the classic version is more classic doll like. Though we still have the doll, most of the clothing has gone missing.


This is from one of our many family vacations in Avon, NC (the Outer Banks). I have a few fleeting memories of vacationing here. My dad likely took this photo of my brothers, mom, and I. I'm thinking this was in early Spring, since we are all wearing hoodies while on the beach. I can assure you that my pockets were packed with sea shells...much to the delight of my mom.


This is likely from another vacation. We used to all get in bathing suits and get in hot tubs or Jacuzzis together. It was a lot of fun. I don't know where this was or who took the photo. We used to take vacations with other families and my mom's extended family. That made the vacations more memorable (seriously those stick out in my head more) than just with my little family. Also, our extended families live far away from us, so mass vacations were great times to bond with each other.


Though I mostly remember vacations with extended family and friends, this is a little family one that I have a few memories of. We went to DC for something my mom had to do. I recall going to the zoo, but not much else. I do remember this outfit and how much I loved it. I don't recall how old I was, but probably about 8. My older brother was a teenager by then and my younger one was probably school age. I've been to DC many times since this 1st trip, because it's only 1.5 hrs from Richmond, VA with no traffic.


This is a rare peek into my family. I'm a private person, because though I love my family, we've been through a lot. I'd rather enjoy the happy things, than discuss the unhappy ones. My parents and brothers are all very creative, though I don't know if my older brother still makes artwork, as we don't talk often and he lives in TN. I was raised in a creative and chaotic household. For that, I've become a stronger and more adaptive person. Though I'm a creature of habit, I love trying new things and playing with materials in wacky ways, just like my mom does.

Sunday, May 12, 2013

DESIGN PROCESS: Random Jewelry Projects

I've been playing with jewelry projects and concepts for the past few weeks, trying to determine what I like doing the most and what has the best consistent results. This is fun, but can be frustrating at times. Still, without playing, I wouldn't learn anything. Below the collage, I'll explain what my Instagram photos are of. My phone camera has trouble picking up fine detail, but you get the general idea.


1) I bought 2 packs of tiny chain tassels by Tim Holtz from Tuesday Morning a few weeks ago. There were 3 different metals and 9 tassels per pack. I took the 6 antique silver ones and made two earrings. I played around with the design, but decided on clustering them by attaching 3 tassels and a latch back earring hook with a large jump ring, for both earrings. I'm not super happy about the clashing metals, but it won't be too hard to fix IF I can find nice antique silver hooks that don't make my ears have an allergic reaction. Otherwise, they are fun.

2) I went to Lowes and Home Depot a few weeks ago while Alex was at a Girl Scout meeting, and raided the paint samples for great paper colors and faux finishes. My intention is to use them for jewelry crafts. I got an asinine amount of paint samples at both stores. My favorites are the metallics from Martha Stewart, because they have a great luster and texture. The ones from Lowes (I don't recall the brand) are nice too, but are flat and low shimmer metallics. These are 4 of the many metallics I found.

3) While at Tuesday Morning, I bought a pack of tiny faux light bulbs by Tim Holtz. I've been eyeing these at craft stores for a long time, so I was happy to see them at an affordable price elsewhere. I used wire to make loops and wrap the bulbs. I attached small jump rings and latch back earring hooks to the smaller bulbs. Post photo taking, to the larger bulb, I looped black thin hemp cord around the wire loops and did a series of half knots to make a twisted necklace. I haven't finished it, since I'm not totally happy with that treatment. I might cut the hemp cord and just add ribbon.

4) I broke out my scrapbook paper stash last weekend. I played around with stacking black cardstock and adding this flocked paper on it. I used Matte Mod Podge to glue the pieces together. I'll likely use this finished piece for a necklace. However, playing with this inspired me to make the paper painted galaxy jewelry I've been working on this week.

5) Recently, my husband asked me to buy something inexpensive online with the replacement debit card, to make sure it was working. I poked around on Etsy looking at jewelry supplies. I found these thin curved tube beads. The 1st pack has 100 and the 2nd 136. They are 2 different sizes. I want to make some complicated metal jewelry with them to extend my jewelry making skills. Also, they say Space Pirate to me, which has been my recent futuristic obsession...being part of the League of Space Pirates and all...aka costuming madness. Who knows, they could become some kick ass harness. This will take a lot of playing and work, but if I hate it, I can always break the cord and make something else with the beads. No harm done.

6) This morning, I decided to make an black to silver ombre glitter necklace and earrings set. I took a small rectangle of existing stacked papers, added a black cardstock scrap, divide the rectangle into the needed pieces...2 small rectangles for earrings, and a pendant. I used Mod Podge Gloss and a lot of experience with glitters to add this glitter. I'm not totally happy with it, but it's not terrible for my 1st time with an ombre like this. For glitter eye makeup, I would normally blend out the harsh lines with eyeshadow, but that doesn't apply here. I'll figure it out. My phone camera had a lot of trouble photographing these pieces. The silver is lighter in person. After the final sealing coats of Mod Podge have dried, I'll finish making them into jewelry. I'll add silver jump rings and earring hooks to the small rectangles. For the pendant, I'll add silver jump rings, chain, and a lobster clasp.

That is all for now. I'm waiting for black chain and lobster claps to arrive, so I can finish off a lot of galaxy jewelry designs. I plan on listing a few next week. I'll of course post nice photos (take with my regular camera...vs the crappy phone) and links to the listings. I also have other motif designs planned, for those of you with more Earthly than space likes.

Saturday, May 11, 2013

DESIGN PROCESS: Silver or Black Chain

Here's a sneak preview of some necklaces I've been working on. These two are for me, but I have made many others in similar styles to sell. Before I start adding the metal bits to finish them, I need help deciding which one looks better...the silver or the black. Leave a comment below letting me know your choice.

If you are curious as to what the designs are, the left is a sun and the right is a rainbow galaxy. These are my fantasy versions, but who knows, they could really exist like this somewhere in the vast space we float in.

Friday, May 10, 2013

JEWELRY: A Painted Paper Galaxy

Sorry there hasn't been much content this week, but I've been busy making jewelry this week. A LOT of jewelry! I chose to design some jewelry using my original watercolor artwork of galaxies, planets, moons, suns, and other spacey things. I wanted to make it stable enough to not need a glass locket case, so I chose a complicated paper method to make a thick enough and protected way to wear the paintings. These will be listed in my Etsy shop over the next week. It's time for something new that features my artwork and isn't something other people can create. I love making all sorts of accessories, and wanted to get back into jewelry making. I'll see how this goes, and decide from there where to go with this. I'll post finished photos as the pieces are listed, but here is a little preview of what this week looked like while working.


1) Some of the paintings were cut apart to make multiple jewelry pieces...like earring and necklace sets.
2) A lot of the painting, like the splattering, required my fingers to get painted too. Splattering is always fun, so I don't complain.
3) My 2 furry assistants insisted that I take a break. That is Pippi yawning, and Sophie behind her.
4) This is what the paintings looked like after I had sealed them, and glued them to a paper for layering. This is just a portion of the many tiny paintings.

These photos are from my Instagram. Feel free to follow me there if you want to know what I've been doing during the week. Warning, there are a lot of cat photos, but I there are a lot of crafty and adventure photos too.

Wednesday, May 8, 2013

SHOES: Basic and Decorative Flats

Since I was recently talking about my Spring essentials, I thought I should do a series of posts about wardrobe basics. Working on the other essentials list and building off it, I want to show more examples. My style is gothic bohemian, which tends to be dark and a bit frilly, but these basics can be applies to other styles and color choices. Having a good wardrobe of basics is a good starting point for any style. The pieces don't need to be expensive, but they do need to fit well.

I'm going to start with the bottom and work up. Without a good pair of shoes, the rest of the outfit doesn't matter. If they don't fit right, you won't walk correctly and you will get blisters. Everyone has gotten a blister from poorly fitting shoes. It's terrible when it happens, and worse if you can't change or remove your shoes quickly! The shoes I wear the most often are flats. Since the soles are flat and the style has little to no elevation of a heel, they are the most comfortable to wear. They come in a variety of fabrics, prints, colors, styles, shapes, and embellishment levels, they can fit any person's fashion style while being comfortable. My favorite ones in my closet are plain black. I also love my printed slip ons, black and white oxfords, and basic sneakers. I added a few more examples of with different fabrics, prints, and styles to show you the variety of available ones. If the examples below aren't available for sale when you click their photos, check Ebay and Amazon for similar styles, or head to your local shoe store to be properly fitted for a fabulous pair of flats.


PIN THIS IMAGE

Sunday, May 5, 2013

VINTAGE INSPIRED: Victorian Party in Vintage Style

I'm going to a Victorian tea party today for my daughter, so I wanted to dress up fancier than normal. We also have a birthday dinner later with friends and family. I'm wearing a vintage Betsey Johnson dress similar to the one pictured, with a vintage Betsey Johnson black velvet underbust coat. I love how her designs look on my body. Under the dress I'm wear a black bra, black lace undies, a knee length full slip, and black opaque stockings.

If you aren't familiar with what a full slip is, then I'll explain. It's basically a thin dress of sorts. Mine has adjustable shoulder straps much like a bra, has darts at the bust for shaping, and loosely skims my body to my knees. I also have a full length version, but that one doesn't have adjustable shoulder straps or darts, and has a v neckline that wouldn't look right with the scoop neckline of my lace dress. This type of slip is called a slip dress or full slip. It's length can range from knee to ankle. The most common ones come in white and black, with an occasional color or flesh tone...which never matches my skin color, and probably doesn't match many other either. For me the point of wearing a slip is to have a little modesty, especially when wearing something see through like this lace dress. A flesh tone gives the appearance of nudity, and can look a little odd when there is a sudden panel of flesh color that doesn't divide at the legs. When choosing what type of slip to wear, consider your own body shape, the cut of the dress, and the length of the dress. You don't want your slip showing if possible, as again the point is to look classy and a bit modest. One of my pet peeves is when a slip isn't worn with sheer dresses. This happens a lot with celebrities, which makes me cringe at their stylist. These ladies should look classy and expensive, not trashy and cheap.

If you don't own one, you need to! Head to your local lingerie shop (most chains don't carry real slips, but sheer useless versions) or look on Ebay. A lingerie shop is normally willing to fit you. If you want to buy one on Ebay (the one I'm wearing today is secondhand from Ebay), you will need to know your body measurements. If you don't know your measurements, get a sewer's tape measure, and get to measuring! For the bust, put on your favorite bra (if you wear one), measure around your chest at the fullest point of your breast. For your waist, measure around at the smallest point. This is typically near the end of your rib cage. For your hips, measure around your hips at the largest point of your butt. Write these measurements down if you can't remember them. Additional ones you will need is the length from your shoulders to under your bust, and from your shoulders to your knees and to your ankles. Regular internet retailers typically have these measurements readily available. Ebay sellers will normally provide you with garment measurements. Some will be flat measurements, which is normally just the front of the garment, and half of the total circumference of the garment.

For sheer tops and skirts, wear a camisole or tank top, and a half slip (which is just the skirt portion) in the appropriate length for the skirt. It's best for your slip to be slightly shorter than your garment, to ensure that it won't hang out of the bottom. Keep slits in mind too. The slip should be shorter than the length of the slit, so it doesn't show as you move. Hopefully this info will be the next time you want to wear a sheer dress, skirt, or shirt.


Victorian Party in Vintage Style


Related Posts with Thumbnails

Popular Posts