
Skull-A-Day 4.0 - Tutorial - #18 Leaf Rubbing Skull
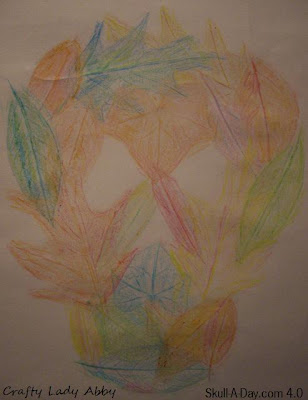
As you read in the related Skull-A-Day post, I made this one because it's Fall and because I wanted something that my 7 y/o daughter could do too. She didn't make a skull, but she did use the technique to make a pretty picture from the leaves.

Supplies:
- Leaves - You want to collect these from outside. They need to be still flexible, and not crumbly. Other than that, any type of leaf will do
- Crayons - You want different colors and for them not to have the wrapper on, or have a smooth flat end
- Paper - I used thin construction paper, but computer weight paper would work too. You can use light or dark colors. Just make sure your crayons are the opposite. Dark paper=lighter crayons and light paper=darker crayons
- A flat clean hard surface - Any textured surface would alter the quality of your rubbing, so you want your surface to be clean, hard and flat for the best results
Alternatives:
- Colored Pencils - I know this will work for a rubbing, but you need to be light with your application
- Chalk - I'm not sure if this will work with the light texture of a leaf, but feel free to experiment
- Charcoal - This might be too smeary for a rubbing, but with a light touch, it might work well
Instructions:
1)Look through the leaves you collected and sort them by type and size. This will help you will selecting which ones to use.
2) Lay your paper on your flat surface.
3) Since my paper color was so light, I used a white crayon to lightly sketch out the skull shape. If you want to roughly sketch out your design area, you want to use a crayon that is close to the color of your paper. You will barely be able to see it, but it does help with placement of the leaves.
4) Choose a leaf and move it around on top of the paper until you decide where you want it to be.
5) Carefully line up the leaf under the paper in the position you wanted it to be.
6) Hold your leaf still by pushing on the paper above it.
7) Using a flat area of a crayon, lightly rub over your leaf. When you get an idea of where the edges and veins are, rub slightly harder over those areas to make them stand out better. For some variation in color, I used a few different color crayons for each leaf. This is how the Fall leaves are in nature, so it is fitting.
8) Continue to do steps 4-7 until you have a design that you like.
This is something that a kid can do too, so overall, it's a simple project. My daughter didn't create a skull, but she did enjoy pick up leaves outside, gathering crayons and doing her own leaf rubbing. We just did ours on light paper, but she wants to try the same thing on dark paper. It could be neat with glow-in-the-dark crayons and as a black light reactive piece. With anything, experiment and find what works best for you.
Very cool idea! I will try this some time. Thanks for sharing this with us!
ReplyDeleteThanks. I love sharing how to make things.
ReplyDelete