
SEWING DIY: Makeup Brush Roll with Shield and Smooth Interlinings
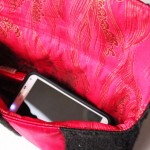
I created this makeup brush roll is great for traveling, when you only want to take a little makeup. I used Shield Interlining, which helps prevent moisture and allergens. I used Smooth Interlining to make the roll more stable and help support the thin Shield Interlining. There are slots for different sizes of makeup brushes and necessities. There is a nice sized velcro closed pocket for makeup. Over the brush pockets, there is a protective flap which helps keep them contained when the roll is closed. Without the shield interlining, this roll could be used for crocheting, as the brush pockets can hold hooks and scissors. The pocket can hold small projects, tiny hooks, stitch counters, wire, tapestry needles, beads, or any other small materials and tools.
This project is part of a Handmade Holiday Blog Hop. To see the other projects and enter the giveaway, head to the bottom of this post.

.jpg)
.jpg)
.jpg)


This project is part of a Handmade Holiday Blog Hop. To see the other projects and enter the giveaway, head to the bottom of this post.
DIFFICULTY: Intermediate
TIME: It took me about 5 hours to finish, and that was with me being very careful about the stitching. Time is relative to sewing experience and how intricate you make your design.
CARE: Handwash and hang to dry.
TIME: It took me about 5 hours to finish, and that was with me being very careful about the stitching. Time is relative to sewing experience and how intricate you make your design.
CARE: Handwash and hang to dry.
SUPPLIES:
- Shield Interlining
- Cotton fabric - A print and solid or two coordinating prints, about 1/2 yard of each
- Matching or coordinating thread
- Black 3/4" hook and loop tape
- Sewing machine
- Hand sewing needle
- Clear drafting ruler
- White chalk, disappearing marker, or pen
- Scissors
- Iron
- Straight pins
- Seam ripper
- Chopstick
MEASUREMENTS:
To make this exact project, you need to cut fabric according to my measurements. If you are excellent at patternmaking, feel free to alter my design as you see fit...add more pockets, make it longer/taller, etc.
From the print:
Outer - 23" wide by 10" tall
Flap top - 16" wide by 10" tall
Ties - 24" wide by 2" tall
From the lining (black):
Lining - 23" wide by 10" tall
Flap back - 16" wide by 10" tall
Long pocket - 16" wide by 7" tall
Side pocket - 10" wide x 10" tall
From Shield Interlining:
For Lining - 23" wide by 10" tall
For Flap back - 16" wide by 10" tall
From Smooth Interlining:
For Outer - 22" wide by 9" tall (one inch smaller than outer fabric)
Hook and Loop Tape:
For the side pocket - 8" long
INSTRUCTIONS:
1) Using your ruler and marking implement, to measure out the project pieces according to the above guide. Cut them out with the scissors.
2) Center the Smooth Interlining onto the back of the outer piece, with the rough side down. The rough side is the adhesive. Flip the layers over, so the fabric is face up.
3) Set your iron to Cotton. Carefully iron the layers together, working from the center out, making sure they smoothly adhere. Move the iron around, so it doesn't burn the fabric. Check the edge of the Smooth Interlining to make sure it's fully adhered. Iron more if needed.

4) Match up the Shield Interlining to the back of the black lining and flap pieces. Pin in place. Baste stitch around 1/4" from the edges, making sure to smooth them out. The Shield Interlining isn't adhesive (I tested it), so it needs to be basted into place.
5) Topstitch across the lining, at 1/4, 1/2, and 3/4 of the way on the fabric (dividing the fabric horizontally in fourths. This will keep the Shield Interlining flat.
6) Time to crease the pocket hems. Fold one edge of the square side pocket over 1". Iron flat. Fold it over again 1" and iron flat.
7) Fold over one long edge of the long pocket over 1/2" and iron flat. Fold that edge over another 1/2" and iron flat.
8) On the sewing machine, topstitch the pocket hems in place, slightly away from the folded edge.
9) Place the long pocket onto the lining, with the hem face down. Match up the bottom right edges together. Pin in place.
10) If it helps, you can draw the segment lines with chalk and the ruler. Topstitch the segments. I made 2 for larger brushes, 8 for smaller brushes, and 2 for a small mirror and products. You could make the larger segments to fit a thin eyeshadow palette.
11) Stitch the
2) Center the Smooth Interlining onto the back of the outer piece, with the rough side down. The rough side is the adhesive. Flip the layers over, so the fabric is face up.
3) Set your iron to Cotton. Carefully iron the layers together, working from the center out, making sure they smoothly adhere. Move the iron around, so it doesn't burn the fabric. Check the edge of the Smooth Interlining to make sure it's fully adhered. Iron more if needed.
4) Match up the Shield Interlining to the back of the black lining and flap pieces. Pin in place. Baste stitch around 1/4" from the edges, making sure to smooth them out. The Shield Interlining isn't adhesive (I tested it), so it needs to be basted into place.
5) Topstitch across the lining, at 1/4, 1/2, and 3/4 of the way on the fabric (dividing the fabric horizontally in fourths. This will keep the Shield Interlining flat.
6) Time to crease the pocket hems. Fold one edge of the square side pocket over 1". Iron flat. Fold it over again 1" and iron flat.
7) Fold over one long edge of the long pocket over 1/2" and iron flat. Fold that edge over another 1/2" and iron flat.
8) On the sewing machine, topstitch the pocket hems in place, slightly away from the folded edge.
9) Place the long pocket onto the lining, with the hem face down. Match up the bottom right edges together. Pin in place.
10) If it helps, you can draw the segment lines with chalk and the ruler. Topstitch the segments. I made 2 for larger brushes, 8 for smaller brushes, and 2 for a small mirror and products. You could make the larger segments to fit a thin eyeshadow palette.
11) Stitch the
11) Line up one side of the hook and loop tape along the side seam of the long pocket. Pin in place if needed. Sew the hook and loop tape around the edges.
12) Line up the matching hook and loop tape strip with the back of the side pocket hem. Pin in place. Sew around the edges.
13) Line up the side pocket pieces, according to the hook and loop tape matching. Pin in place. Baste stitch the sides down, 1/4" from the edge. When you are done, the front and back of this, but with the side pocket basting stitch too. (One side of the shield interlining is missing basting, because it was bunching when I topstitched the layers and I had to undo it with a seam ripper)
14) Back to the flap! Line up the edges, noting which way the print is going! Shown in the below photo, the top edge is what will be attached to the pocket area. The fabrics should be right sides facing. Stitch around the sides and bottom about 1/4" from the edge.
15) Cut the corners at an angle, making sure not to cut through the stitching. This helps shape the corners. Turn the flap inside out, pushing out the corners with a chopstick.
16) Iron the flap, making sure the edges are neat and crisp. This prevents the two fabrics from shifting while topstitching.
17) Topstitch around the 3 seamed edges.
18) Topstitch horizontally across the flap. Same as before, the additional topstitching helps keep the Shield Interlining in place. I followed the print segments, to better hide the stitching on the top.
19) Baste stitch the top of the flap about 1/8" from the edge.
20) Fold the ties in half. Iron flat. Fold in the edges towards the center. Iron flat.
21) Topstitch down the ties slightly away from the folded in edges, making sure to catch all the layers.
22) Fold in two ends and hand stitch them closed. This will encase the raw edge and make for durable ends. (Not shown in this photo)
22) Center the other two ends by the long pocket end, making sure their length is laying across the pocket. Pin in place. Stitch them in place, about 1/4" from the edges. (The below photo shows their placement and finishing...we'll get to finishing in a bit.)
23) Lay the flap in place across the pockets. Pin the top edges together. Sew them together about 1/4" from the edge, along where the previous basting is.
24) Fold the flap in so the loose edge are away from the lining edges. Lay the ties inside, so they are contained.
25) Line the outer fabric edges up with the inner section edges. Pin in place. The side with the ties will remain partially open for turning.
26) Stitch around the edges about 1/2" from the edge, so it surpasses all the basting stitches. Leave about 4-5 inches of the ties side without additional stitching.
27) Clip the corners at an angle, making sure not to cut the stitching. Turn the project inside out. Use the chopstick to shape the corners.
28) Iron these seams flat, so the fabrics aren't rolling at the edges.
29) Lift the flap up away from the rest of the makeup brush roll. Turn the open seam inwards, to match the rest of the seam. Pin in place. Topstitch around the final edges, making sure to close the open seam.
The makeup brush roll is designed to close in thirds, vs actually rolling, like traditional versions. To close it, fold in the side pocket. Fold in one more time. Wrap the ties around in opposite directions and tie. This is a nice flat design which will fit nicely in many carry-on bags and suitcases. Even inside a big purse if needed.
I intend on using my makeup brush roll for an upcoming trip. Would you use this for makeup, or perhaps other needs? Would you make this for yourself, or a friend? These make great gifts. I might make a different version for jewelry, which I will share if I feel it's easy to explain. Happy Makery!
HANDMADE HOLIDAY GIFTS BLOG HOP


Comments
Post a Comment