
JEWELRY TUTORIAL: Separated Triangles Earrings from Upcycled Giftcards
The last 2 days I've shown you how to make different styles of earrings to coordinate with the Geometric Necklace I made. I saved the most complicated for the last. The cutting, drilling, and assembly is more difficult. However, the painting and adding the earring hooks is the same as the previous two pairs. I trust you all can manage this one too. Now that we've completed a pair of Staggered Triangles Earrings and a pair of Stacked Triangles Earrings, it's time to get to learning how to make these Separated Triangles Earrings.

1) Use the diagram below as your guide. This isn't a template, but just a visual guide to accompany my instructions for cutting out the 6 total pieces for this project. With the old scissors, cut one triangle that is about 2-3" wide, along one long side to the other side at event angles. Take that triangle and flip it to the other long side against the angle from that triangle you just cut. Use the fine tip marker to trace the side of the triangle onto the card. Use the old scissors to cut out the 2nd large triangle from the card. On the diagram, these triangles are multiple shades of blue. This will make sense later.
2) It's OK if you don't follow the diagram exactly for this step, as the width of your large triangles might be different than the diagram, depending on how wide you cut them. You can use the excess space how ever you like, and get the same results. This part of the diagram is to give you the shape...shortness of the triangles. Use the short edge of one large triangle to get the width of one short triangle (the purple ones). Use the fine tip marker to mark this width on the card. From the middle of that line, make a dot about 1/2 inch up. Connect the points using the marker. Cut out the short triangle with the old scissors. Lay this short triangle on what remains of the card. Trace around it with the marker. Cut out this 2nd short triangle with the old scissors. Set these two short triangles aside. Set the scraps aside for a future project.
3) With the two large triangles, cut a V in each one about 1/3" from the long sides of the triangles, with the old scissors. You see these Vs in turquoise on the diagram. You will have two smaller triangles left over from cutting. Set the 2 Vs (turquoise) aside with the two short triangles (purple).
4) With the 2 small triangles, cut 1/4" off the bottom of both, using the old scissors. On the diagram, you will see the shortened small triangles in light blue. The scraps from those cuts are in royal blue, as are the other scraps. Place all the scraps together for future projects. Place all the pieces for this project together.

5) With an emery board, gently sand the sides of the project pieces, round the corners, and rough up the front and back sides of the card.
6) The drilling, as I mentioned before, is a little complicated. Look at the below photo for reference. Put the old magazine or phone book down on your work surface. This will make a drilling surface. You will be using the Dremel with the 5/64 bit in it, on a low setting, for each hole.
7) Place the Vs onto the drilling surface. Drill a hole through each V towards the top of each segment. Use the emery board to sand any rough spots across the holes. Set these pieces aside.
8) Put the two small triangles on the drilling surface. Drill one hole by each even angle. Use the emery board to sand any rough spots across the holes. Set these pieces aside.
9) Put the remaining two triangles, the short ones, on the drilling surface. Drill one hole in each by the top corners. Use the emery board to sand any rough spots across the holes.
10) All that drilling is simple, now for the harder placements. Line up each set of earring pieces. You will be using the marker to coordinate dots from the drilled holes on the V and small triangle to the long edge of the short triangles, so the drilled holes will match up for the connecting jump rings.
Starting with one V and one short triangle, use the marker to make dots on the short triangle across from where the holes of the V are. Do the same with the small triangle. Make this set of 4 dots, in this manner, on the other short triangle, using it's coordinating V and small triangle.
11) On the drilling surface, place the short triangles. Carefully drill through those marked holes. Use the emery board to sand any rough spots across the holes.

12) Head outside with your trash bag, black plastic spray paint, chrome spray paint, sponge brush, paper plates, and earrings. Spread the trash bag down on your work surface. Place your earrings face down on the trash bag. Spray the earrings with the black spray paint. Carefully pick up the earrings by the edges and place on a dry spot of the trash bag. Let the earrings dry.
I had a lot of problems with the drying, because paint kept seeping under the pieces as they were drying and the humidity wasn't helping either. This is usual for me. Don't fret about it being perfect, because the chrome treatment will disguise some imperfections.
13) Flip the pieces over. Spray paint the front sides black. Carefully move the pieces to a clean spot on the trash bag. Let the pieces dry.

14) Set a paper plate aside. Spray a small amount of chrome paint onto this plate. Dip the sponge brush into the chrome paint on the plate. Pounce the brush on a clear spot on the plate to get some of the excess off the brush. Place one of the earring pieces in your hand, face down. Pounce the sponge brush onto the piece back. You'll get paint on your hand, but you can scrub this off later. You aren't trying to cover up the black fully. You want some of it to show through, for the aged effect. Reload the brush with paint as needed, making sure you pounce off some excess paint before adding paint to the earrings. You can spray more paint onto the plate if needed too. The paint dries fast, so only spray a small amount at a time. You aren't trying to cover up the black fully. You want some of it to show through, for the aged effect.


15) Bring your supplies and earrings, minus the trash bag, inside. It's time to add the connecting jump rings to the earrings. I use the two plier method when working with jump rings. With the two pliers (one in each hand), open a jump ring. Lay your V and small triangle on top of the short triangle, lining up the holes. Do this for each set of earring pieces. Slide a jump ring through one pair of holes and close it with the two pliers. Do this for each pair of holes on both earrings.

16) The last step is to add the earring hooks. Open the remaining two jump rings, with the two pliers. Slide one onto the top hole of one earring. Slide the loop of one earring hook onto this jump ring. Close the jump ring with the two pliers. Do this for the other earring too. The loop can face either direction, as unlike the previous two pairs of earrings, these look the similar on either side. Once you have finished this step, you are done making these earrings!
SUPPLIES
This post isn't sponsored. It's just me sharing how to make something.
- One old giftcard - I used one old plastic giftcard for these earrings, and had some scraps left over. You need a giftcard that is smooth and doesn't have impressions from numbers or writing, that has warped the plastic
- Old sharp scissors - Cutting through the plastic can cause some damage to your scissors, so use old scissors. However, they need to be sharp enough to easily cut through the plastic. I used large cheap ones from Dollar Tree, that work great for many projects
- Emery board file - You can get a small pack of these from a dollar store, or you can buy a large pack and use them for many projects.. They are great for filing the plastic to make the edges smooth and rough up the shiny surfaces. I prefer them to sand paper for projects like this one
- Dremel with a 5/64 drill bit - I prefer using a Dremel Rotary Tool to a hand crank one for this, because it gets through the plastic quickly and easily. The bit I chose makes holes that my jump rings easily fit into without being too large. It was from this 7 piece drill bit set.
- An old magazine or phone book - Something to use under the pieces as you drill holes
- Black plastic spray paint - I used a Valspar Gloss Black Plastic Paint. If you use a spray paint for plastic, you don't need a plastic primer
- Clear shiny finish spray paint - You need to seal the spray paint before adding the next paint. The Valspar Gloss Clear Spray Paint makes the finish very shiny, which I love
- Chrome spray paint - I love the Valspar Silver Brilliant Metals one. For these earrings, we're not going to use it in a normal way. If you spray the sealer on after you apply the Chrome, you will lose the chrome finish...trust me, it's not a pretty thing
- Small sponge brush - The small sponge brush is for dry brushing
- Paper towels - This paper towels are for the dry brushing
- Paper plate - The paper plate is also for dry brushing
- Trash bag - This is to protect your work surface when working with the spray paints outside. I use a trash bag that I've opened up on the sides
- 10 silver wire jump rings - I make my own with 22 gauge silver craft wire, since I make a lot of jewelry randomly. You can buy jump rings in a pre-made jump rings pack, should you want to. If you make a lot of jewelry, it's faster and cheaper to make your own. If you don't, a pre-made pack will work well
- Wire cutters/nippers and a small dowel rod - Should you chose to make your own jump rings, you'll need these. You will wrap the wire around the dowel rod to create a tight spiral. Use the wire cutters/nippers to cut jump rings from the spiral. Remember, jump rings are even circles
- 2 Jewelry pliers - I use the two plier method when working with jump rings, because jump rings are tiny and hard to handle with just fingers. My pliers and wire nippers are from a pack of 5 jewelry making tools
- 2 Leverback earring hooks - I prefer the leverback style of earring hooks, because they stay on my ears well, and the metal doesn't bother my ear piercings. you can use the fish hook/French wire, ball stud with loop, clip on with loop style, should you chose to. Any of these will work great
**I am affiliated with Amazon, and receive a small compensation if you chose to purchase something through the links. The money goes to fund more projects.**
INSTRUCTIONS
1) Use the diagram below as your guide. This isn't a template, but just a visual guide to accompany my instructions for cutting out the 6 total pieces for this project. With the old scissors, cut one triangle that is about 2-3" wide, along one long side to the other side at event angles. Take that triangle and flip it to the other long side against the angle from that triangle you just cut. Use the fine tip marker to trace the side of the triangle onto the card. Use the old scissors to cut out the 2nd large triangle from the card. On the diagram, these triangles are multiple shades of blue. This will make sense later.
2) It's OK if you don't follow the diagram exactly for this step, as the width of your large triangles might be different than the diagram, depending on how wide you cut them. You can use the excess space how ever you like, and get the same results. This part of the diagram is to give you the shape...shortness of the triangles. Use the short edge of one large triangle to get the width of one short triangle (the purple ones). Use the fine tip marker to mark this width on the card. From the middle of that line, make a dot about 1/2 inch up. Connect the points using the marker. Cut out the short triangle with the old scissors. Lay this short triangle on what remains of the card. Trace around it with the marker. Cut out this 2nd short triangle with the old scissors. Set these two short triangles aside. Set the scraps aside for a future project.
3) With the two large triangles, cut a V in each one about 1/3" from the long sides of the triangles, with the old scissors. You see these Vs in turquoise on the diagram. You will have two smaller triangles left over from cutting. Set the 2 Vs (turquoise) aside with the two short triangles (purple).
4) With the 2 small triangles, cut 1/4" off the bottom of both, using the old scissors. On the diagram, you will see the shortened small triangles in light blue. The scraps from those cuts are in royal blue, as are the other scraps. Place all the scraps together for future projects. Place all the pieces for this project together.
The cutting diagram
5) With an emery board, gently sand the sides of the project pieces, round the corners, and rough up the front and back sides of the card.
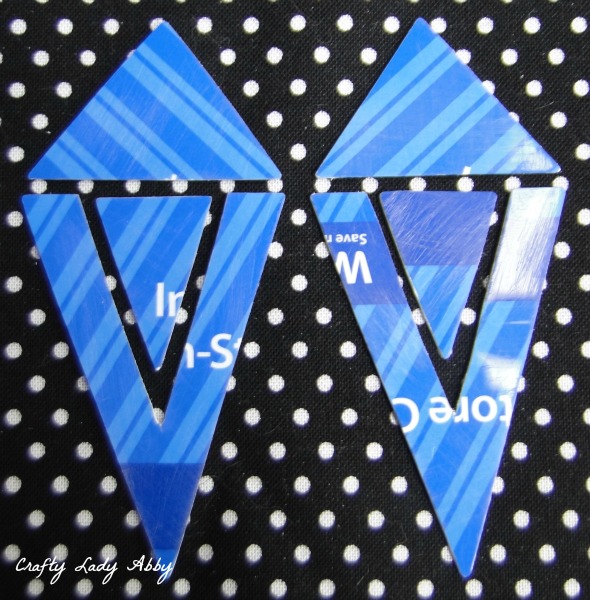
6) The drilling, as I mentioned before, is a little complicated. Look at the below photo for reference. Put the old magazine or phone book down on your work surface. This will make a drilling surface. You will be using the Dremel with the 5/64 bit in it, on a low setting, for each hole.
7) Place the Vs onto the drilling surface. Drill a hole through each V towards the top of each segment. Use the emery board to sand any rough spots across the holes. Set these pieces aside.
8) Put the two small triangles on the drilling surface. Drill one hole by each even angle. Use the emery board to sand any rough spots across the holes. Set these pieces aside.
9) Put the remaining two triangles, the short ones, on the drilling surface. Drill one hole in each by the top corners. Use the emery board to sand any rough spots across the holes.
10) All that drilling is simple, now for the harder placements. Line up each set of earring pieces. You will be using the marker to coordinate dots from the drilled holes on the V and small triangle to the long edge of the short triangles, so the drilled holes will match up for the connecting jump rings.
Starting with one V and one short triangle, use the marker to make dots on the short triangle across from where the holes of the V are. Do the same with the small triangle. Make this set of 4 dots, in this manner, on the other short triangle, using it's coordinating V and small triangle.
11) On the drilling surface, place the short triangles. Carefully drill through those marked holes. Use the emery board to sand any rough spots across the holes.
This is what my pieces looked like drilled. You can use this as a reference guide for drilling all of your holes into your pieces.
12) Head outside with your trash bag, black plastic spray paint, chrome spray paint, sponge brush, paper plates, and earrings. Spread the trash bag down on your work surface. Place your earrings face down on the trash bag. Spray the earrings with the black spray paint. Carefully pick up the earrings by the edges and place on a dry spot of the trash bag. Let the earrings dry.
I had a lot of problems with the drying, because paint kept seeping under the pieces as they were drying and the humidity wasn't helping either. This is usual for me. Don't fret about it being perfect, because the chrome treatment will disguise some imperfections.
13) Flip the pieces over. Spray paint the front sides black. Carefully move the pieces to a clean spot on the trash bag. Let the pieces dry.
Excuse the crappy paint job...sigh. Real metal is textured sometimes right...yeah.
14) Set a paper plate aside. Spray a small amount of chrome paint onto this plate. Dip the sponge brush into the chrome paint on the plate. Pounce the brush on a clear spot on the plate to get some of the excess off the brush. Place one of the earring pieces in your hand, face down. Pounce the sponge brush onto the piece back. You'll get paint on your hand, but you can scrub this off later. You aren't trying to cover up the black fully. You want some of it to show through, for the aged effect. Reload the brush with paint as needed, making sure you pounce off some excess paint before adding paint to the earrings. You can spray more paint onto the plate if needed too. The paint dries fast, so only spray a small amount at a time. You aren't trying to cover up the black fully. You want some of it to show through, for the aged effect.
Here is what my paint plate looked like. The solid chrome circle is the old paint. The circle layering that one is what freshly sprayed chrome paint looks like. The zig zag section is where I've pounced off excess paint. The splatter is from spraying the paint onto the plate. You can see there is just a little paint on my sponge brush.
Paint both earrings like this, and place them on a different paper plate, chrome side up. Let the paint dry. When they are dry, flip them over and paint the front sides the same way. Place them on the plate to dry. You can wash the paint off your hands while the earrings are drying.
The earrings should look like this when you are done pouncing on the chrome paint.
15) Bring your supplies and earrings, minus the trash bag, inside. It's time to add the connecting jump rings to the earrings. I use the two plier method when working with jump rings. With the two pliers (one in each hand), open a jump ring. Lay your V and small triangle on top of the short triangle, lining up the holes. Do this for each set of earring pieces. Slide a jump ring through one pair of holes and close it with the two pliers. Do this for each pair of holes on both earrings.
This is what one earring looks with the pieces layered and the jump rings secured.
16) The last step is to add the earring hooks. Open the remaining two jump rings, with the two pliers. Slide one onto the top hole of one earring. Slide the loop of one earring hook onto this jump ring. Close the jump ring with the two pliers. Do this for the other earring too. The loop can face either direction, as unlike the previous two pairs of earrings, these look the similar on either side. Once you have finished this step, you are done making these earrings!
The FINISHED earrings! When you hold them up (as they would be when worn), all the pieces are separated and not touching as they are when laid down.
This pair of earrings is finished, but there are a total of three different tutorials for my geometric triangle earrings.
This is all three pairs of finished earrings.
1) Staggered Triangles Earrings
2) Stacked Triangles Earrings
3) Separated Triangles Earrings

1) Staggered Triangles Earrings
2) Stacked Triangles Earrings
3) Separated Triangles Earrings
I'd love to see what you've created using my tutorial! Send me an email, craftyladyabby@gmail.com , and I'll likely share your project here...with you permission of course. Happy making!
Comments
Post a Comment